Make your own gift bags
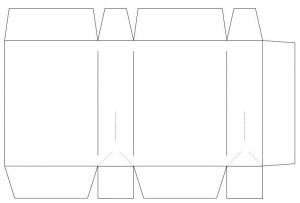
Whenever I shop for gift bags, I rarely get the one kind of gift bag in the quantity I require. The color, design or size tends to vary. This led me to venture into the idea of making my own bags. Initially, I was a little apprehensive about the amount of time and effort it would take. After some research, I discovered a template that made it so easy to make these bags.
What you need:
- A pair of scissors/blade/sharp knife
- Chart paper
- Glue
- Ruler
- Hole punch
- Ribbon or thick thread
- Scale up the template to the size required and transfer or print out the pattern onto the decorated paper. Cut out carefully using knife/scissors.
- Press lightly along the back of the crease so that they will fold easily. Fold down and glue the flaps along the top edge of the bag.
- Next, glue the long, side tab to form a bag shape.
- Then glue the base of the bag, folding in the short end tabs first.
- Form the pleats down the sides of the bag by pressing the long edges together gently so that the paper is pushed inwards.
- Using a hole punch, make two holes on both sides near the top edge. Cut two equal lengths of ribbon or thread that are thick as a shoestring. Thread each end of ribbon/thread through the holes to make two looped handles. Knot the ends at the back of the holes to secure.
Make your own gift box
Unlike gift bags, gift boxes are not that readily available. Gift boxes are ideal for carrying most gifts and look even better in a gift hamper. They are versatile as they can hold both edible and inedible items. To ensure you get exactly the color and design you want this Diwali, here is an easy template for a gift box that you can scale to the exact size you require.
What you need:
- A pair of scissors/blade
- Chart paper
- Glue
- Ruler
- Cut along all the solid lines, then press down along the dashed lines using a blade and ruler. (Pressing along the lines like this helps the paper to fold more easily in the next steps).
- Apply glue on the side-tab and then close the template into a tube shape.
- Fold in the tabs on the bottom of the box. Apply some glue before folding in the last tab, to hold the bottom in place.
- The lid has a simple tab closure
Decorating your gift bags/boxes
This is the best part of making your own boxes and bags!
- Visit a thread store or haberdashery and choose from a range of ribbons, rhinestones, sequins, beads,etc.
- From a stationery store, get some glitter paper and chart paper that you can use by cutting out shapes of flowers, paisleys, animal shapes, diyas, Christmas trees and so much more. Stick these cutouts on your boxes and bags.
- You can use old saris and clothes to make cutouts and borders for the bags/boxes.
- Use dry flowers for a simple and classy look.
Tips:
- To cut down on prep time, get the whole family involved. This way the work time is cut in half and it’s much more fun than doing it alone.
- If you have a printer or access to one, print out the template in the size you require. This saves you the hassle of drawing the design out yourself.
- Make sure the glue applied on the bags/boxes is completely dry before use.


